Alarms are notifications that trigger when certain predefined conditions are met by elements in a plant.
The Alarms module allows you to monitor, manage, and analyze alarms by notifying you when something needs your attention. Alarms can trigger when one or more activation conditions are met. In the Alarms module, triggers are grouped by plant and by alarm.
The system uses a smart mechanism that constantly checks for new alarms by scanning devices hierarchically, from the highest to the lowest. When the system detects an alarm, it stops checking lower devices to avoid displaying too many Alarms related to the same issue.
Note: By default, after an alarm is triggered, the system notifies you every 24 hours that the alarm is still active. It is possible to customize this notification period when configuring the alarm conditions.
Alarms are also automatically hidden if the issue detected was reported in another alarm.
Important: After you customize your filter, you must click the to apply the new criteria.
You can open the Context Menu for alarms by selecting one or more alarms and right-clicking them. For more information, see the Alarms Context Menu below.
You can also access the Alarm Information by selecting it from the Context Menu. This menu contains detailed information and data analytics tool for the specific alarm. For more information, see Alarm Information window below.
Figure 1. Alarms module
Quick
filters: Toggle an alarm type to display or hide
related alarm:
Communication
Stop
Warning
Preventive
Toggle a status to display or hide related
triggers:
Status
Color
code
Description
Active
The criteria that caused the alarm activation
are still valid and no operator has been assigned to the alarm.
Notified
The criteria that caused the alarm activation
are still valid, but an operator has been assigned to the alarm.
Inactive
The alarm deactivation criteria have been
met.
On hold
A user put the alarm on hold for a specific
period of time.
Note: The default icons and colors are
customizable. Contact your GPM representative if you want to
change them.
Period
picker: select a date range from the drop-down list
to display alarms that were activated during that period:
Current day
Custom period
Last 15 days
Last 30 days
Last 7 days
Unrestricted period
Note: When you choose Unrestricted Period,
the system automatically disables active alarms to avoid
generating too many queries.
Plant
filter: select a plant from the drop-down menu to
display only the alarms related to it.
Keyword
filter: enter a keyword to filter alarms by their
name, Alarm ID, or global Alarm ID:
Use # before a number to search
by Alarm ID.
Use * before a number to search
by global Alarm ID.
Use ; to separate multiple
criteria.
Saved
filters: select a filter from the drop-down menu to
apply it to the alarm list.
Apply
filters: click to apply the combination of filters
you have selected.
Advanced
filters: click to display the Advanced Alarms
Filters window and customize your filter with more advanced
options. For further information, see Advanced Alarm Filters.
Total tiggers: displays count of the
alarms that are currently displayed.
More
actions: click to display more actions:
Export Alarms: click to export alarms that
are currently displayed to a Microsoft Excel format.
For further information, see Export Data to
File.
Audible Alarms: toggle to enable or disable
audio alarms.
Blinking Alarms: toggle to enable or disable
blinking alarms.
Group Alarms: toggle to group or ungroup the
alarms. When alarms are ungrouped, you can select
multiple triggers and perform bulk actions on
them.
Alarms table: displays groups of alarms
with their triggers, automatically collapsed, and sorted in
descending order by severity, status and activation
time.
Double-click a group of alarms to expand
it and display related triggers.
Click a column header to sort the table by
the values of that column. Rearrange columns by dragging and
dropping the headers.
Right-click a trigger to open the context menu and perform
quick changes.
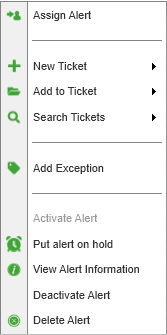
Figure 2. Context menu
Option
Description
Assign
alarm
Click to open a dialog that allows you to
assign the alarm to an operator.
New
ticket
Select a new ticket type to create a new
ticket and automatically pair the selected element to it.
Add to
ticket
Place your cursor here, enter a ticket ID in
the search field, and press enter to add the selected element to an
existing ticket.
Search
tickets
Choose a ticket type to open the related
tickets in the Tickets view.
Add
exception
Click to create an exception and add the alarm
ID in the exception description. For further information, see the Commands
section.
Put alarm on
hold
Click to put the alarm on hold. You must specify
the time period for which the alarm remains on hold. Once the time
is up, the alarm reverts to its previous status. You can also input
the reason for putting the alarm on hold.
It is also possible to delete an existing hold.
This resets the alarm to its previous status.
View alarm
information
Click to open the Alarm
Information window and see further information about the
alarm.
Deactivate
alarm
Click to deactivate the alarm.
Important: This action requires the administrator password.
Delete
alarm
Click to delete the alarm.
Important: This action requires the administrator password.
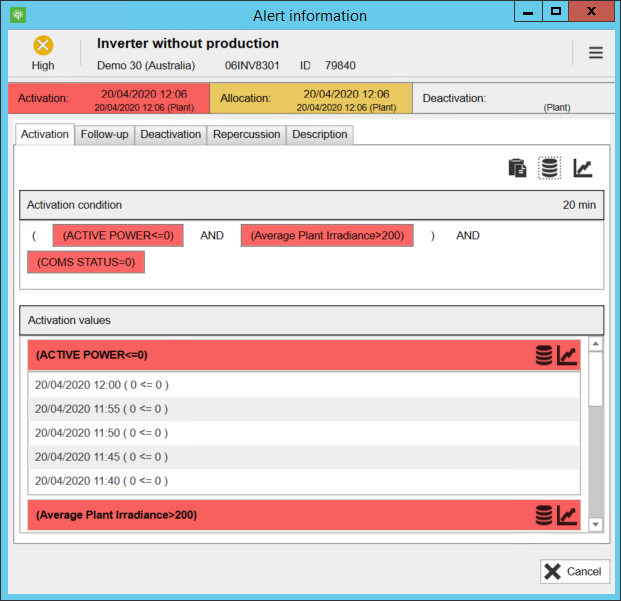
Alarm Information window
In the Alarm Information window, the upper displays the alarm priority and the timestamp of Activation, Allocation, and Deactivation, which are the core events of an alarm. In the upper area, you can also create tickets and automatically link them to the alarm by clicking the icon.
The area below the upper bar is organized in tabs. Each tab contains a different piece of information. When it is possible to perform actions on the data displayed, the tab will include Action buttons.
Figure 3. Alarm Information
Tab
Description
Activation
Includes the activation condition and the
latest values of each criteria used in the activation
condition.
Follow-up
Includes all the actions performed by
operators on the trigger since it was triggered.
Deactivation
Includes the deactivation condition and
the most recent values of each criteria used in the deactivation
condition.
Repercussion
When the triggering of the alarm affects
availability, users can see the timestamp of the issue as well as
its total duration. If the status of the trigger is "On hold", this
tab also includes the time that the alarm has been on hold.
Description
Includes the alarm description.
Figure 4. Advanced alarm filters
Action buttons: click to perform actions on the alarm:
Apply: apply the filters to the list without saving.
Save: save the filters for future use.
Delete: delete the selected filter.
Status: select the alarm status:
Communication
Stop
Warning
Preventive
Production loss exclusion: select whether to include or exclude alarms that caused losses in production.
Time zone: select the time zone for the plant.
Severity: select the alarm severity. You can select more than one option.
Treatment: select whether the alarm have been included in a ticket.
Name or ID: enter the alarm name or ID.
Type: select one or more alarm types.
Origin: select the plants or devices that the alarm is associated to.
Note: The alarm origin allows you to filter alarms by plants or devices using the pre-defined groups of your portfolio.
Period: select the alarm time criteria and period.